Thursday, January 28, 2010

Konnyaku こんにゃく


Konnyaku is a curious thing.  Is it a vegetable, an animal, an amorphous blog of atoms?  Turns out it actually is a plant, and an ugly one at that.  I'd be curious to know why the first human who ate it decided to even approach the thing.  Maybe he was starving and delirious in the jungle.  Apparently it's called konjak in English, but as I've never heard that word in my life, I'm content to call it konnyaku.  Konnyaku doesn't have much of a taste and comes in a variety of shapes and sizes, all of them gelatinous in nature.  You can also get konnyaku that has been infused with such things as mushrooms and cayenne pepper.  My favorite is the spicy konnyaku, particularly the noodle shaped one.
As far as nutrition goes, you know the cabbage diet?  The one where you eat lots and lots of cabbage because it has very little calories or nutritional value  so you can eat as much as you want?  Konnyaku is Japan's answer to the cabbage diet.  It's fat free, contains next to nothing in calories, and has lots of fiber.  So it's a great filler food but don't rely on it as your sole sustainance.  Probably the greatest thing about konnyaku is it's cheap, so you can throw it in to just about any recipe to bulk it up without affecting its flavor.


How to Prepare
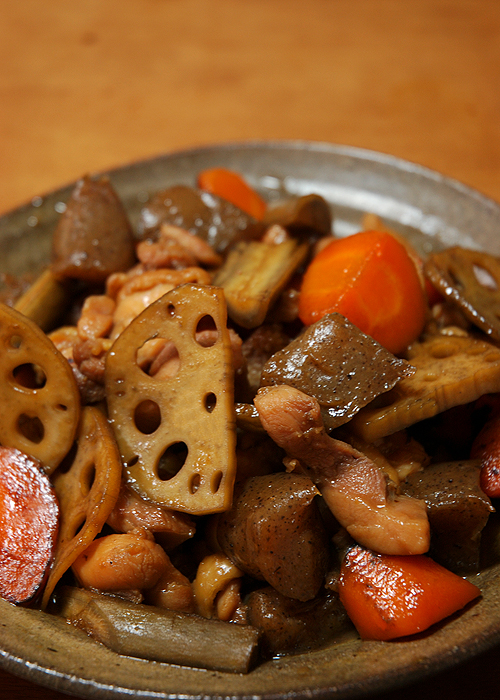
Konnyaku comes packed usually in fish broth so you'll want to drain that.  You can find varieties that are packed in water as well.  Once it's drained it's ready to go!  If you buy a big block you can cut it into any shape you want.  Or you can buy ones shaped as noodles, balls, on a stick, if you can imagine it, konnyaku has been shaped into it.  Konnyaku can be eaten hot or cold, stewed, steamed, boiled, frozen, just about any way you want.

Easy Konnyaku Recipe

My favorite way of eating konnyaku is in nabe, but you can also throw it into stir-fries and other dishes easily.

Pork and Konnyaku Miso Stir-fry

Makes 4 servings

Prep Time: About 1 hour

Ingredients:


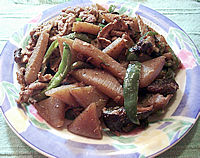
  • 2 sheets of konnyaku, cut into triangles
  • 150 grams pork, cut into 4 cm strips
  • 1 tablespoon sesame oil
  • 1 small pack shiitake mushrooms, destemmed and cut into halves
  • 2 green peppers, cut into strips
  • 1/2 onion, thinly sliced
  • 2 cups cabbage, chopped
  • 3 tablespoons cooking sake, divided
  • 2 tablespoons soy sauce, divided
  • 2 teaspoons sugar
  • 1 teaspoons garlic, minced
  • 1 teaspoons ginger paste
  • 1 teaspoons togarashi
  • 1 tablespoon water
  • 30g miso paste 味噌
Preparation:
1.  Mix together 2 tablespoons sake, 1 tablespoon soy sauce, miso paste, sugar and water.  Add pork and konnyaku to the marinade.  Allow to marinate for about 20 minutes.
2.  In a frying pan, heat sesame oil over medium high.  Add onions to frying pan.  Saute until starting to become translucent.
3.  Add green peppers, cabbage and mushrooms to frying pan.  Saute for 3-4 minutes, or until green peppers being to soften.
4.  Add garlic, ginger, togarashi, remaining sake and soy sauce.  Saute for 1 minute or until fragrant.
5.  Add pork, konnyaku, and sauce.  Saute until pork has browned and sauce has begun to thicken.
6.  Serve with rice.
7.  Finished!


Thursday, January 21, 2010

Dekopon デコポン

It's officially dekopon season!  Dekopon are the sweetest, juiciest citrus you will ever have the pleasure of consuming.  It's like someone took a tangerine and jumbofied it.  Delicious!

The story goes that back in the 70s the Japanese were trying to create a citrus that could compete with navel oranges.  Scientists worked hard crossing this fruit with that, but the results were paltry at best and the experiment abandoned.  But not all hope was lost!  A farmer from Kumamoto stole a branch from one of the experimental trees and started his own experiments.  Soon, he got this fruit yielding to commercial levels, gave it a vaguely sexual name, and ever since it's been a big success!

How to Prepare
Peel and devour!

Easy Dekopon Recipe

To be honest, a dekopon rarely makes it outside of its rind before I've destroyed it in my mouth.  But on the off-chance you do have dekopon laying around, here's a great and super easy recipe.

Dekopon and Honey Jello
Makes 2 servings

Prep Time: About 1 hour

Ingredients:

  • 2 dekopon
  • 5 grams powdered gelatin
  • 1 - 2 teaspoons honey
  • 1 dash lemon juice
  • 1/2 cup water
Preparation:
1. Mix 2 tablespoons water with the powder gelatin.  Mix well.
2. Peel dekopons.  Break into segments.  Take 3/4 of the segments and remove the pith as well as you can from the segment.  Cut into bite-sized chunks.  Set aside.
3.  Juice the remaining dekopon segments into a measuring cup.
3. Add lemon juice and enough water to the dekopon juice to equal 300mL or 1 1/4 cup.  Pour the juice mix into a small, microwave-safe bowl.
4. Add honey, 1/2 teapoon at a time, and mix well.  Add honey until desired sweetness is achieved.
5. Microwave the dekopon mixture for one minute.  Add gelatin to the heated mixture and whisk until gelatin has dissolved.
6. Fill a large bowl with ice water.  Place the small bowl with the jello into the ice bath.  Stir the jello occasionally.  Once jello begins to jiggle, remove the bowl from the ice bath.
7. Layer the chunks of dekopon and jello into small glasses.
8. Finished!


Friday, January 15, 2010

Mikan みかん


Right now it's peak season for mikan, those little citrus fruits that I could eat by the dozen if I'm not careful.  In English they're known as clementines or satsuma oranges depending on where you live.  I've heard the term satsuma orange has to do with one of the areas where mikan are grown in Japan, but the only place I know of where mikan are worth their snuff is Wakayama.  Like most citrus, mikan are packed with vitamin C so grab a couple if you want to ward off the scurvy, yarr!

How to Prepare
One of the best things about mikan is they're so easy peel.  I actually loath dealing with navel oranges now after having lived with mikan so for long.  The peel of mikan is also great for cooking and especially baking, so don't let it go to waste!

Easy Mikan Recipe

This may sound like a funky combo for a salad but it's actually delicious!  As an added bonus, endives are one of those random vegetables that for some reason are cheaper in Japan than in the US.  I don't really get how that one works.

Citrusy Endive Salad

Makes 4 servings

Prep Time: About 30 minutes

Ingredients:

  • 1 tablespoon balsamic vinegar
  • 1/2 teaspoon honey
  • 1/4 teaspoon salt
  • 2 tablespoons olive oil
  • 3 to 5 mikan, peeled and segmented
  • 2 to 3 endives (エンダイブ or チコリー)
  • 2 inner ribs of celery (the pale white looking ones), including leaves
  • 1/4 cup black olives, pitted and cut into slivers
  • 1/2 cup thinly sliced red onion
  • 1/4 cup chopped parsley or loosely packed flat-leaf parsley
Preparation:
1. Whisk together vinegar, honey, and salt in a small bowl until salt are dissolved, then add oil in a slow stream, whisking well. Season with pepper.
2. Remove the pith from your mikan segments but don't worry about being anal retentive, just remove the biggest chunks.
3. Halve endives lengthwise, then cut out and discard the cores. Cut endives diagonally into 1/2-inch-wide strips and put in a large salad bowl.
4. Separate celery leaves from ribs and cut ribs diagonally into very thin slices.
5. Roughly chop the celery leaves.  Add the leaves, ribs, olives, onions, parsley, and mikan to the endives.
6. Whisk dressing, then gently toss salad with enough dressing to coat.
7. Finished!

An easy salad for a light weeknight meal!


Wednesday, January 13, 2010

Renkon れんこん


Renkon is known as lotus root in English, that funky root that looks like a flower and packs some crunchy goodness.  You can do just about anything with lotus root cooking wise, just make sure to choose ones that are firm and a light brown color.  The smaller the lotus root the more tender and crispy it will be, so don't pick ones that are too big!  Lotus root is low in calories and high in vitamin C, fiber, potassium, and vitamin B6.  Right now lotus root is in season so it's the best time to try it!

How to Prepare
If you're lazy, you can buy pre-soaked lotus root in the same section of the supermarket that has the prepared bamboo shoots, bean sprouts, etc.  If you want to prepare it yourself, first thoroughly wash the root.  Then peel the outside layer of the root with a peeler.  Slice the lotus root into thin rounds and soak in a mixture of 2 cups water and 1 tablespoon vinegar for about 30 minutes.  This will cut the bitterness in the lotus root.  From there you can cut it up anyway you please and stew, stir fry, boil, fry, etc.
Easy Lotus Root Recipe

This traditional Japanese recipe is about as easy as it gets.  Chop everything up and let it stew for awhile!

Chikuzenni 筑前煮

Makes 2 servings

Prep Time: About 45 minutes

Ingredients:

  • 1/2 a chicken breast 鶏もも肉
  • 1/2 a carrot
  • 4cm length of lotus root
  • 50 grams soaked bamboo shoots (can buy already packed in water) ゆでたけのこ
  • 1/2 a length of burdock root ごぼう
  • 2 shiitake mushrooms, destemmed and quartered
  • 2 tablespoons mirin みりん
  • 2 tablespoons soy sauce
  • 1 tablespoon vegetable oil
Preparation:
1. Cut chicken into bite-sized pieces.
2. Cut vegetables into large, bite-sized pieces.
3. Heat vegetable oil in a medium sized pot on medium heat.  Add chicken, carrots, shiitake, bamboo, lotus root, and burdock root.  Stir fry until chicken begins to change color.
4. Add enough water to the pot to just cover the ingredients.  Bring to a boil and then reduce to a simmer.
5. As scum rises to the surface of the water, use the strainer to catch the scum.
6. Once scum seems to be mostly clear, add mirin and soy sauce.  Bring to a boil once more.
7. Once liquid has reduced to about 1cm to the bottom of the pot, remove from heat.
8. Finished!

Of course you can add just about anything to this recipe, such as onions, konnyaku, etc.  Try it out!


Monday, January 11, 2010

Soba そば


Soba, those thin buckwheat noodles often seen in Japanese restaurants, are one of the foods you're supposed to eat for the new year in Japan.  They're supposed to represent a long life and considering their health benefits, that might not be far off from the truth!  Soba is basically a fat free food that is also surprisingly high in protein considering it's a noodle.  Soba is also believed to help with high blood pressure due to the bioflavonoid present.

How to Prepare
You can find dried soba noodles at almost any supermarket.  Shiga has some particularly good dried soba made in Ibuki that can be found at most Heiwados.  Fresh soba noodles taste better and can usually be found in the fridge section of the market.  In the States, you should be able to find soba at any Asian market.

If you're feeling really adventurous, make your own soba noodles!  Mix equal parts wheat flour and buckwheat flour in a bowl.  Make a small indentation in your mixed flour and add a small amount of water.  Mix the water in with the flour.  Add enough water until you can make a fairly dry ball of dough.  When you pinch the dough together it should feel like you're pinched your earlobe.  If your dough is too wet or sticky, simple add some more buckwheat flour.

You should knead the dough for a long time.  20 minutes or longer.  You want the dough to fully form its gluten chains and to have no air pockets when you form it into a ball.  When you've think you've kneaded it for long enough, knead it for another 5 minutes to make sure.

Lightly flour your counter with katakuri starch (片栗粉) or potato starch.  Flour your rolling pin with the starch as well and roll out your dough.  You want a large sheet like this:

Next you will fold the dough into third with lots of starch to make sure it doesn't stick:


On a cutting board, cut the dough into thin strips to make the noodles.  Make sure your knife is sharp!

Finally you'll boil the noodles for about two minutes, then immediately wash them in cold water to stop them from cooking further.  Your noodles are done!

Easy Soba Recipe

Here's a non-traditional take on soba noodles, salad style!

Spicy Soba Noodles


Makes 4 servings

Prep Time: About 45 minutes

Ingredients:

  • 450 grams chicken breast, skin removed
  • 250 grams soba noodles
  • 1 tablespoon sesame oil
  • 3 tablespoons black vinegar 黒酢
  • 2 tablespoons soy sauce
  • 1 tablespoon chili oil
  • 2 garlic cloves, minced
  • 1/2 teaspoon sugar
  • 1 carrot, julienned
  • 6 small shiitake mushrooms, destemmed and thinly sliced
  • 1 red bell pepper, julienned 
  • 1 bunch mizuna 水菜, chopped (can substitute arugula)
  • 3 scallions, thinly sliced
  • 1 cup cooked edamame beans, pods removed

Preparation:
1.  Season chicken with salt and pepper.  Grill chicken until fully cooked (about 8 minutes each side).  Cut into thin strips and set aside.
2. While chicken is grilling, cook noodles according to package directions.  Drain noodles in a colander and rinse well under cold water to cool, then drain well. Toss noodles with sesame oil in a large bowl.
3.  Stir together vinegar, soy sauce, chili oil, garlic, sugar, and salt in another bowl until sugar is dissolved, then add to noodles and toss until coated.
4.  Add chicken, carrot, mushrooms, bell pepper, mizuna, scallions, and edamame to the bowl of noodles.  Toss together.
5.  Finished!


Monday, January 4, 2010

Brown Rice 玄米

Happy New Year!!

To celebrate the new year, my fiance and I are making a pledge to eat healthier.  People assume that Japanese food is healthy but really it can be just as junk ridden as food anywhere else in the industrialized world.  You wouldn't believe the amount of products with HFCS and the like in it.  So let the healthy eating begin!
Brown rice might seem like a lame thing to be posting about, but you still have entire nations that don't know that brown rice kicks the ass of white rice any day of the week.  White rice is just as bad as bleached flour, a bunch of essentially empty carb calories.  But with brown rice your stomach gets an instant injection of thiamine, magnesium, iron and more.   In fact, if you want to avoid Beriberi Disease, brown rice is the way to go!

So what makes brown rice brown and white rice white?  Brown rice is basically the rice straight off the stalk; just the husk has been removed.  White rice has the bran and germ removed, which is where the vast majority of rice's nutrients come from.  So why the heck do we eat white rice?  Probably for the same reasons we eat white bread and deep fried Coca Cola, we're idiots!

One important thing to remember about brown rice (and whole grains in general) is they do go rancid quickly.  If you don't think you'll use your brown rice often, keep it in the fridge or cook large batches in advance and freeze them into individual servings.

How to Prepare
Hopefully you have a rice cooker.  If you do, just fill your rice cup with brown rice, dump it in the cooker, and fill the water to the brown rice line.  Push start and you're good to go!  If you don't have a rice cooker, you should run out and buy one RIGHT NOW.  But in the meantime, boil four cups of water, throw in one cup of brown rice, cover, and cook for 40 minutes or until the water has disappeared like magic and you have fluffy rice.

There's also the GABA system, which most modern rice cookers have a button for.  You basically stew the brown rice in warm water for 20 hours before cooking, causing the rice to germinate and release more nutritional goodness.  I've never tried this since my rice cooker is ancient and needs to be put out to pasture but once I buy a new rice cooker I definitely plan on getting one with a GABA function.

Easy Brown Rice Recipe

For this recipe, we're going to cheat altogether and use puffed brown rice.  Normally a bland cereal your hippie aunt would force you to eat, we're going to transform it into magical deliciousness.

Homemade Granola Bars

Makes about 24 bars

Prep Time: About 1 hour

Ingredients:

  • 2 cups oats
  • 1/2 cup wheat germ OR rice bran (if you live in Japan, you can pick this up for free at any Ookini Shokudou!) OR ground flaxseed etc etc (this is going to help act like cement for the bars)
  • 1 cup puffed brown rice 玄米パフ (can find in the cereal aisle of Japanese supermarkets and Whole Foods)
  • 1/2 cup pumpkin seeds OR sunflower seeds OR shredded coconut
  • 1 cup crushed almonds OR peanuts OR walnuts (I think you're getting the idea)
  • 1/4 cup brown sugar
  • 1/2 cup honey
  • 3 tablespoons butter
  • 2 teaspoons vanilla extract
  • 1/2 teaspoon salt
  • large handful of dried cranberries OR raisins OR chocolate chips blah blah etc etc

Preparation:
1. Mix together the oats, wheat germ, sunflower seeds, and nuts in a baking dish with sides. Toast them in the oven for 10-12 minutes, stirring every few minutes so that they don’t get burned. (If you don't have an oven, toast them on your stove with your frying pan).
2. Line a glass baking dish with parchment paper.
3. Put the brown sugar, honey, butter, vanilla, and salt into a saucepan and bring to a simmer, stirring constantly until it begins to thicken.  Stirring is important, you don't want it to burn!
4. Mix everything together in a large bowl. Your toasty goods, your gooey goods, and your fruity goods.
5. Mix everything like you're making Rice Krispies Treats.  The better you coat everything with the sugar mix, the better your granola bars will hold together.  Next, put your mix onto your prepped parchment paper.
7. Just like Rice Krispies Treats, spread everything out evenly in the dish with a wooden spoon.  Then use another piece of parchment paper to press down on the bars like you're attempting to make diamonds out of them.  The tighter you press them together, the better they'll hold up!
8. Wait 2-3 hours until the bars have cooled down completely.  Remove the top layer of parchment paper, and lift the granola out onto a cutting board.
9. Cut it up into bars and wrap them up for chowing on whenever you need a snack!
10. Finished!

This recipe can be modded easily for whatever your tastes are.  I've made them with peanut butter and chocolate chips and I've made them with toasted soy nuts and dried figs.  Whatever you fancy can be done!