Showing posts with label lemon. Show all posts

Friday, March 26, 2010

Wasabi-ha わさび葉


Tis the season for lots of fresh greens!  I noticed today that wasabi leaves are officially on the market, a specialty of the prefecture I live in.  Wasabi leaves are similar to arugula in that they have a bit of a spicy bite to them but they're not as bitter as arugula.  If you can't find wasabi leaves in your local market arugula makes a decent substitute.  Of course you could always try growing your own wasabi if your area is wet enough!

How to Prepare
Personally I'm not a fan of how wasabi leaves are usually prepared in Japanese cooking, stewed to hell and back.  Instead I go for the fresh approach; chop them up and throw them in a salad or wilt them in a pasta.  Just make sure to rinse them before you eat them.

Easy Wasabi Leaves Recipe

This recipe is as easy as it gets, seriously!

Pan Seared Salmon with Wasabi Leaves
Makes 2 servings

Prep Time: About 30 minutes

Ingredients:
  • 2 salmon fillets
  • lemon juice from 1/2 a lemon
  • 1.5 tablespoons olive oil
  • salt and pepper
  • 2 sprigs fresh dill, chopped (optional)
  • 3 cups wasabi leaves, chopped
  • 2/3 cup cherry tomatoes, halved
  • 1/4 cup thinly sliced red onion
  • 1 tablespoon olive oil
  • 1 tablespoon balsamic vinegar
Preparation:

1.     Toss salmon with lemon juice, olive oil, salt, pepper, and dill.  Marinate 15 minutes.
2.     Cook salmon, skinside down, in a frying pan over medium high heat for 2-3 minutes.  Make sure to carefully lift the salmon from the pan from time to time to keep it from sticking.
3.    Reduce heat to medium.  Cover the pan and cook the salmon for another 3-4 minutes, or until it's cooked to your liking.  I usually cook my salmon medium rare; cook it a bit longer and it will be medium.
4.    While salmon is cooking, toss wasabi leaves, tomatoes, and red onion together.  Just before serving, toss with olive oil, vinegar, and salt and pepper to taste.
5.   Place salad on plate.  Top with salmon.  Serve with brown rice or some sort of pasta.
6.  Finished!

Thursday, March 18, 2010

Seri セリ


Man have I gotten bad about updating.  I apologize.  If anyone can figure out a way for me to be able to post from work I'm all ears!

Seri, known as Japanese parsley or Chinese celery, is a springtime vegetable found for only a few short weeks here in Japan.  Seri is high in vitamins C and A as well as potassium.  It tastes great fresh just thrown in a salad and can also be used in stews, stir-fries, and soups.

How to Prepare
Make sure to select seri that is bright in color and not wilted or musty looking.  It should look similar to cilantro or other leafy herbs.  From there just chop it up and throw it in your recipe!

Easy Seri Recipe

While seri is best known for its role in the traditional spring dish nanakusa no sekku, all seven of those vegetables can kind of be a pain to get a hold of.  Instead will make a tasty fresh salad with our seri!

Seri and Chicken Salad
Makes 4 servings

Prep Time: About 30 minutes

Ingredients:
  • 1 bunch of seri
  • 300 grams chicken breast
  • 1/2 a red onion
  • 40 grams harusame (super thin rice noodles)
  • 4 tablespoons peanuts, crushed
  • pinch of salt
  • 2 teaspoons and 2 tablespoons vinegar, divided
  • 2 teaspoons fresh lemon or lime juice
  • 4 tablespoons fish sauce (also known as nam pla)
  • 1 tablespoon sugar
  • 1 togarashi pepper, chopped or 1 teaspoon dried togarashi
  • 1 clove garlic, minced
  • 1/2 teaspoon minced ginger
Preparation:

1.     Roughly chop seri.  Thinly slice the red onion and place into cold water.
2.     Cook harusame according to package directions, then place in cold water to stop from cooking further.  Drain and chop into bite sized strands.
3.    Cut chicken into bite sized pieces.  Season with pinch of salt and 2 teaspoons vinegar.  Cook in microwave for two minutes or until cooked through.
4.    Mix together remaining vinegar, lemon juice, fish sauce, sugar, togarashi, garlic, and ginger.
5.   Drain red onions.  Toss together seri, onion, harusame, chicken, and dressing.
6.  Place into small bowls and garnish with peanuts.
7.  Finished!


Friday, February 19, 2010

Kogomi コゴミ

I'm on a roll so why not post another recipe lol.

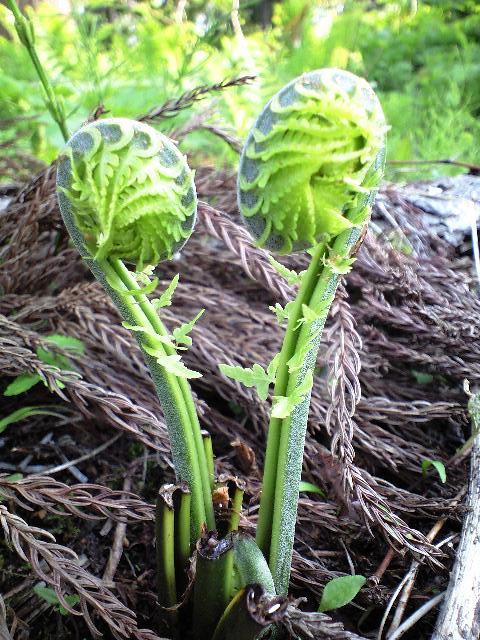
Kogomi are the tender sprouts of the ostrich fern or fiddlehead fern.  It might weird you out to think of eating a fern but these are one of the most delicious plants you can sink your teeth into in the spring!  But you can usually only get them for about 3-4 weeks once you see them start popping up in the supermarket so make sure you grab them when you do see them!

They taste like a cross between asparagus and brussel sprouts, making them an easy addition to pastas, sautes, and so on (as my students would say).  In Japan they tend to be included in salads, tempura, and stewed dishes.

How to Prepare
With kogomi you want to cut off the bottom inch of the stem where it has hardened and then give them a quick rinse.  From there you can fry, saute, stew, basically any way you would prepare asparagus you can also prepare kogomi.

Easy Kogomi Recipe

Garlic sprouts are easy to include in just about any recipe.  This stir-fry recipe is super easy and only takes about 45 minutes to make including marinating time.

Kogomi Pasta
Makes 2 servings

Prep Time: About 45 minutes

Ingredients:
  • 8-10 kogomi heads
  • enough pasta for 2 people (about 150 grams)
  • 5-6 small shiitake mushrooms, destemmed and sliced, or maitake mushrooms, chopped
  • 1/2 small onion, thinly sliced
  • 1 garlic clove, minced
  • 1.5 tablespoons olive oil
  • 1/4 cup fresh grated Parmesan cheese
  • 2 teaspoons fresh lemon juice
Preparation:

1.     Add kogomi to a large pot of boiling salted water. Cook until just crisp-tender. Transfer to bowl of cold water using slotted spoon. Cool kogomi slightly to stop it from cooking and drain. 
2.     Add pasta to same pot of water and boil until just tender but still firm to bite.  Drain well.
3.    Heat olive oil over medium heat in a saucepan.  Add onions and saute until starting to brown.
4.    Add garlic and saute 1 minute.
5.   Add mushrooms and lemon juice and saute until just starting to become tender.
6.  Add kogomi and pasta.  Stir well.
7.  Add cheese and stir until full incorporated.
8. Finished!


Thursday, January 21, 2010

Dekopon デコポン

It's officially dekopon season!  Dekopon are the sweetest, juiciest citrus you will ever have the pleasure of consuming.  It's like someone took a tangerine and jumbofied it.  Delicious!

The story goes that back in the 70s the Japanese were trying to create a citrus that could compete with navel oranges.  Scientists worked hard crossing this fruit with that, but the results were paltry at best and the experiment abandoned.  But not all hope was lost!  A farmer from Kumamoto stole a branch from one of the experimental trees and started his own experiments.  Soon, he got this fruit yielding to commercial levels, gave it a vaguely sexual name, and ever since it's been a big success!

How to Prepare
Peel and devour!

Easy Dekopon Recipe

To be honest, a dekopon rarely makes it outside of its rind before I've destroyed it in my mouth.  But on the off-chance you do have dekopon laying around, here's a great and super easy recipe.

Dekopon and Honey Jello
Makes 2 servings

Prep Time: About 1 hour

Ingredients:

  • 2 dekopon
  • 5 grams powdered gelatin
  • 1 - 2 teaspoons honey
  • 1 dash lemon juice
  • 1/2 cup water
Preparation:
1. Mix 2 tablespoons water with the powder gelatin.  Mix well.
2. Peel dekopons.  Break into segments.  Take 3/4 of the segments and remove the pith as well as you can from the segment.  Cut into bite-sized chunks.  Set aside.
3.  Juice the remaining dekopon segments into a measuring cup.
3. Add lemon juice and enough water to the dekopon juice to equal 300mL or 1 1/4 cup.  Pour the juice mix into a small, microwave-safe bowl.
4. Add honey, 1/2 teapoon at a time, and mix well.  Add honey until desired sweetness is achieved.
5. Microwave the dekopon mixture for one minute.  Add gelatin to the heated mixture and whisk until gelatin has dissolved.
6. Fill a large bowl with ice water.  Place the small bowl with the jello into the ice bath.  Stir the jello occasionally.  Once jello begins to jiggle, remove the bowl from the ice bath.
7. Layer the chunks of dekopon and jello into small glasses.
8. Finished!


Saturday, December 12, 2009

Nashi 梨


Asian pears: crispy, juicy, delicious.  And because they are much firmer than their European counterparts, can be used as a substitute for apples in most recipes.  Asian pears are high in fiber as well as vitamins K and C.

How to Prepare
You can prepare an Asian pear the same way you would apples.  Just decore and start cooking!

Easy Asian Pear Recipe

The first year I was in Japan there were some Asian pears hanging out in the clearance bin of my local supermarket.  Regardless of the fact that I had eaten Asian pears plenty of times in the States, for some reason I was under the delusion they were apples.  So I bought them with the intention of making some applesauce with them.  Even when I got home and was decoring and chopping up these "apples" I was thinking, "Gee, these are some juicy apples!"  It wasn't until I had finished making the "applesauce" that I realized they were Asian pears.  A really dumb moment in my kitchen but it turned out to be delicious!

Pearsauce

Serves 4

Prep Time: About 30 mins

Ingredients:

  • 6-8 large Asian pears, peeled, cored, cut into small pieces
  • 1/2 cup water
  • 1/4 cup brown sugar
  • 2 tablespoons fresh lemon juice
  • 1 1/4 teaspoons ground cardamom or cinnamon
  • 1/2 teaspoon fresh grated ginger
Preparation:
1. Combine all ingredients in heavy medium saucepan. Cover, bring to boil.
2. Reduce heat to medium-low; simmer until apples are very tender, stirring occasionally, about 30 minutes.
3. Cool slightly.
4. Smush pears with a potato masher or a pork for chunky sauce. For smooth sauce, transfer to a blender and blend until smooth.
5. Finished!

One thing my great-grandmother would always do when she made homemade applesauce was to serve it warm with a dollop of sour cream on top.  It's just as delicious when done with this pearsauce.