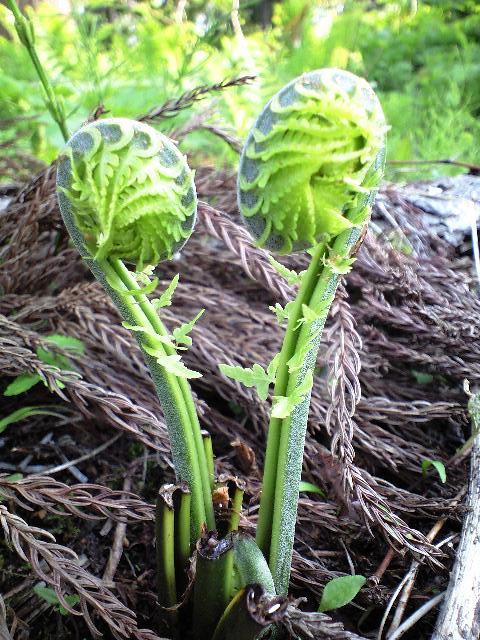
Kogomi are the tender sprouts of the ostrich fern or fiddlehead fern. It might weird you out to think of eating a fern but these are one of the most delicious plants you can sink your teeth into in the spring! But you can usually only get them for about 3-4 weeks once you see them start popping up in the supermarket so make sure you grab them when you do see them!
They taste like a cross between asparagus and brussel sprouts, making them an easy addition to pastas, sautes, and so on (as my students would say). In Japan they tend to be included in salads, tempura, and stewed dishes.
How to Prepare
With kogomi you want to cut off the bottom inch of the stem where it has hardened and then give them a quick rinse. From there you can fry, saute, stew, basically any way you would prepare asparagus you can also prepare kogomi.
Easy Kogomi Recipe
Garlic sprouts are easy to include in just about any recipe. This
stir-fry recipe is super easy and only takes about 45 minutes to make
including marinating time.
Kogomi Pasta
Makes 2 servings
Prep Time: About 45 minutes
Ingredients:
8-10 kogomi heads
enough pasta for 2 people (about 150 grams)
5-6 small shiitake mushrooms, destemmed and sliced, or maitake mushrooms, chopped
1/2 small onion, thinly sliced
1 garlic clove, minced
1.5 tablespoons olive oil
1/4 cup fresh grated Parmesan cheese
2 teaspoons fresh lemon juice
Preparation:
1. Add kogomi to a large pot of boiling salted water. Cook until just
crisp-tender. Transfer to bowl of cold water using slotted spoon. Cool kogomi slightly to stop it from cooking and drain.
2. Add pasta to same pot of water and boil
until just tender but still firm to bite. Drain well.
3. Heat olive oil over medium heat in a saucepan. Add onions and saute until starting to brown.
4. Add garlic and saute 1 minute.
5. Add mushrooms and lemon juice and saute until just starting to become tender.
6. Add kogomi and pasta. Stir well.
7. Add cheese and stir until full incorporated.
8. Finished!
Sorry I haven't posted in ages! Things have been pretty hectic here with the end of the school year coming up. To make up for it I'll do two posts tonight :)
Gobo is Japanese burdock and the big, dirt-covered root things you see
in the supermarket. It has a nice crunch and almost nutty flavor.
You'll often see it in school lunch and in Japanese restaraunts in
various forms. My personal favorite is fried gobo you will sometimes
find in izakayas. If you are lazy like me, you can find gobo that has
already been cleaned and julienned in bags near the bean sprouts and
bamboo shoots. But it's kind of expensive to buy it that way so it's
really better to buy it fresh and prepare it yourself.
How to Prepare It's important to thoroughly clean
gobo before you use it. Scrub the gobo with hot water until you have
gotten most of the dirt off of it. Then you want to take a knife and
scrap off the outer skin of the gobo to remove any remaining dirt.
Usually gobo is cut into matchstick sized pieces but you can also chop,
dice, etc. It will just take longer to cook done that way.
After
you have cut your gobo up into matchstick sized pieces, it's important
to allow the gobo to soak in water for at least 10 minutes. If you
don't do this, the gobo will have an overwhelmingly strong taste. 10
minutes should do the trick but it's okay to allow it to soak for
longer.
Easy Gobo Recipe
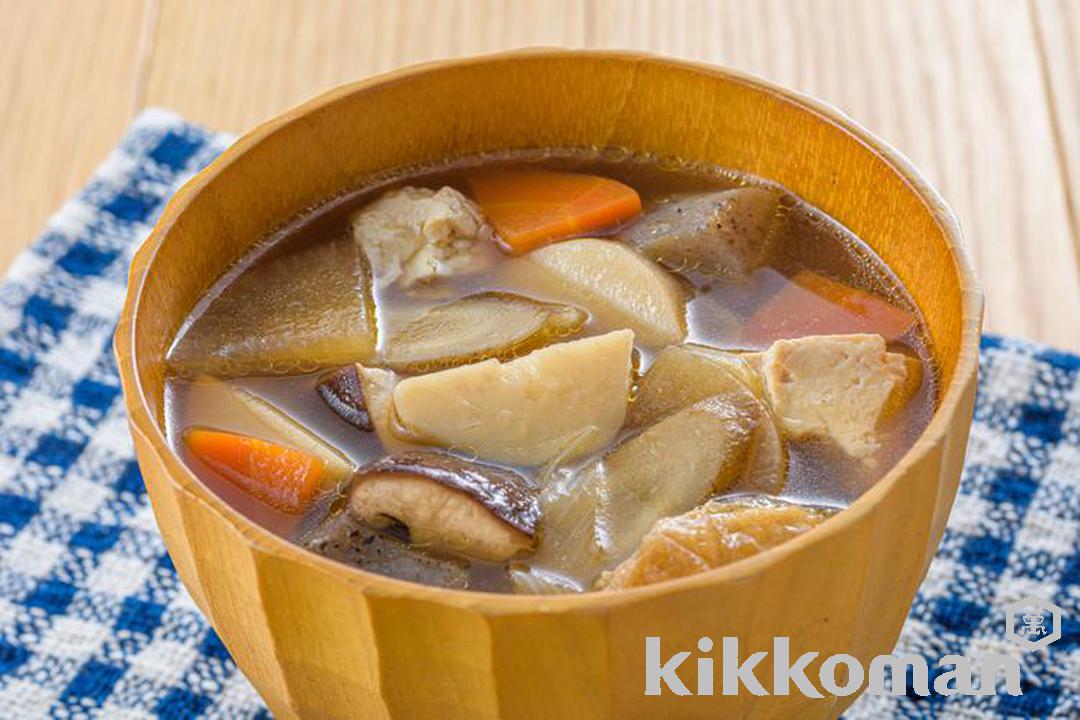
There are tons of ways to use gobo, though you will usually find it in
soups, stir-fries, and Japanese-style salads. Here is a simple
vegetable soup that can be made with gobo. From start to finish, this
soup takes about 25 minutes to prepare.
Preparation:
1. Drain water from the tofu.
2. Cut daikon and carrot into thin half moon shaped slices.
3. Destem the mushrooms and cut caps into quarters.
4. Cut gobo into thin, round slices and place in water for 10 minutes. Drain water.
5. Peel the skin from the taro roots, salt the outside of the taro, allow to sit for a minute and then wash the taro.
6. Cut the konnyaku into large bite-sized pieces. Wash thoroughly.
7. Place the fried tofu into boiling water until most of the oil
has been removed from the tofu. Remove from the water and cut into
bite-sized pieces.
8. Heat oil in the soup pot over medium-high. Add daikon,
carrots, mushrooms, gobo, taro, konnyaku, and fried tofu to the pot.
Stir fry for about two minutes.
9. Add dashi and water to the pot. Bring to a boil, then lower
heat so the water is simmering. Skim the top of the soup once every
couple of minutes to remove any scum that rises to the top.
10. While soup is simmering, cut the drained tofu into 4cm blocks. Separate out the bunch of Japanese mustard spinach.
11. Add tofu and spinach to the pot. Add soy sauce, salt, and pepper to the pot.
12. Remove pot from heat once tofu has heated through.
13. Finished!
It's officially dekopon season! Dekopon are the sweetest, juiciest citrus you will ever have the pleasure of consuming. It's like someone took a tangerine and jumbofied it. Delicious!
The story goes that back in the 70s the Japanese were trying to create a citrus that could compete with navel oranges. Scientists worked hard crossing this fruit with that, but the results were paltry at best and the experiment abandoned. But not all hope was lost! A farmer from Kumamoto stole a branch from one of the experimental trees and started his own experiments. Soon, he got this fruit yielding to commercial levels, gave it a vaguely sexual name, and ever since it's been a big success!
How to Prepare
Peel and devour!
Easy Dekopon Recipe
To be honest, a dekopon rarely makes it outside of its rind before I've destroyed it in my mouth. But on the off-chance you do have dekopon laying around, here's a great and super easy recipe.
Dekopon and Honey Jello
Makes 2 servings
Prep Time: About 1 hour
Ingredients:
2 dekopon
5 grams powdered gelatin
1 - 2 teaspoons honey
1 dash lemon juice
1/2 cup water
Preparation:
1. Mix 2 tablespoons water with the powder gelatin. Mix well.
2. Peel dekopons. Break into segments. Take 3/4 of the segments and remove the pith as well as you can from the segment. Cut into bite-sized chunks. Set aside.
3. Juice the remaining dekopon segments into a measuring cup.
3. Add lemon juice and enough water to the dekopon juice to equal 300mL or 1 1/4 cup. Pour the juice mix into a small, microwave-safe bowl.
4. Add honey, 1/2 teapoon at a time, and mix well. Add honey until desired sweetness is achieved.
5. Microwave the dekopon mixture for one minute. Add gelatin to the heated mixture and whisk until gelatin has dissolved.
6. Fill a large bowl with ice water. Place the small bowl with the jello into the ice bath. Stir the jello occasionally. Once jello begins to jiggle, remove the bowl from the ice bath.
7. Layer the chunks of dekopon and jello into small glasses.
8. Finished!
Right now it's peak season for mikan, those little citrus fruits that I could eat by the dozen if I'm not careful. In English they're known as clementines or satsuma oranges depending on where you live. I've heard the term satsuma orange has to do with one of the areas where mikan are grown in Japan, but the only place I know of where mikan are worth their snuff is Wakayama. Like most citrus, mikan are packed with vitamin C so grab a couple if you want to ward off the scurvy, yarr!
How to Prepare
One of the best things about mikan is they're so easy peel. I actually loath dealing with navel oranges now after having lived with mikan so for long. The peel of mikan is also great for cooking and especially baking, so don't let it go to waste!
Easy Mikan Recipe
This may sound like a funky combo for a salad but it's actually delicious! As an added bonus, endives are one of those random vegetables that for some reason are cheaper in Japan than in the US. I don't really get how that one works.
Citrusy Endive Salad
Makes 4 servings
Prep Time: About 30 minutes
Ingredients:
1 tablespoon balsamic vinegar
1/2 teaspoon honey
1/4 teaspoon salt
2 tablespoons olive oil
3 to 5 mikan, peeled and segmented
2 to 3 endives (エンダイブ or チコリー)
2 inner ribs of celery (the pale white looking ones), including leaves
1/4 cup black olives, pitted and cut into slivers
1/2 cup thinly sliced red onion
1/4 cup chopped parsley or loosely packed flat-leaf parsley
Preparation:
1. Whisk together vinegar, honey, and salt in a small bowl until
salt are dissolved, then add oil in a slow stream, whisking well. Season with pepper.
2. Remove the pith from your mikan segments but don't worry about being anal retentive, just remove the biggest chunks.
3. Halve endives lengthwise, then cut out and discard the cores. Cut endives
diagonally into 1/2-inch-wide strips and put in a large salad bowl.
4. Separate celery leaves from ribs and cut ribs diagonally into very thin slices.
5. Roughly chop the celery leaves. Add the leaves, ribs, olives, onions, parsley, and mikan to the endives.
6. Whisk dressing, then gently toss salad with enough dressing to coat.
7. Finished!
To celebrate the new year, my fiance and I are making a pledge to eat healthier. People assume that Japanese food is healthy but really it can be just as junk ridden as food anywhere else in the industrialized world. You wouldn't believe the amount of products with HFCS and the like in it. So let the healthy eating begin!
Brown rice might seem like a lame thing to be posting about, but you still have entire nations that don't know that brown rice kicks the ass of white rice any day of the week. White rice is just as bad as bleached flour, a bunch of essentially empty carb calories. But with brown rice your stomach gets an instant injection of thiamine, magnesium, iron and more. In fact, if you want to avoid Beriberi Disease, brown rice is the way to go!
So what makes brown rice brown and white rice white? Brown rice is basically the rice straight off the stalk; just the husk has been removed. White rice has the bran and germ removed, which is where the vast majority of rice's nutrients come from. So why the heck do we eat white rice? Probably for the same reasons we eat white bread and deep fried Coca Cola, we're idiots!
One important thing to remember about brown rice (and whole grains in general) is they do go rancid quickly. If you don't think you'll use your brown rice often, keep it in the fridge or cook large batches in advance and freeze them into individual servings.
How to Prepare
Hopefully you have a rice cooker. If you do, just fill your rice cup with brown rice, dump it in the cooker, and fill the water to the brown rice line. Push start and you're good to go! If you don't have a rice cooker, you should run out and buy one RIGHT NOW. But in the meantime, boil four cups of water, throw in one cup of brown rice, cover, and cook for 40 minutes or until the water has disappeared like magic and you have fluffy rice.
There's also the GABA system, which most modern rice cookers have a button for. You basically stew the brown rice in warm water for 20 hours before cooking, causing the rice to germinate and release more nutritional goodness. I've never tried this since my rice cooker is ancient and needs to be put out to pasture but once I buy a new rice cooker I definitely plan on getting one with a GABA function.
Easy Brown Rice Recipe
For this recipe, we're going to cheat altogether and use puffed brown rice. Normally a bland cereal your hippie aunt would force you to eat, we're going to transform it into magical deliciousness.
Homemade Granola Bars
Makes about 24 bars
Prep Time: About 1 hour
Ingredients:
2 cups oats
1/2 cup wheat germ OR rice bran (if you live in Japan, you can pick this up for free at any Ookini Shokudou!) OR ground flaxseed etc etc (this is going to help act like cement for the bars)
1 cup puffed brown rice 玄米パフ (can find in the cereal aisle of Japanese supermarkets and Whole Foods)
1/2 cup pumpkin seeds OR sunflower seeds OR shredded coconut
1 cup crushed almonds OR peanuts OR walnuts (I think you're getting the idea)
1/4 cup brown sugar
1/2 cup honey
3 tablespoons butter
2 teaspoons vanilla extract
1/2 teaspoon salt
large handful of dried cranberries OR raisins OR chocolate chips blah blah etc etc
Preparation:
1. Mix together the oats, wheat germ, sunflower seeds, and nuts in a baking dish
with sides. Toast them in the oven for 10-12 minutes, stirring every
few minutes so that they don’t get burned. (If you don't have an oven, toast them on your stove with your frying pan).
2. Line a glass baking dish with parchment paper.
3. Put the brown sugar, honey, butter, vanilla, and salt into a saucepan and bring to a simmer, stirring constantly until it begins to thicken. Stirring is important, you don't want it to burn!
4. Mix everything
together in a large bowl. Your toasty goods, your gooey goods, and your fruity goods.
5. Mix everything like you're making Rice Krispies Treats. The better you coat everything with the sugar mix, the better your granola bars will hold together. Next, put your mix onto your prepped parchment paper.
7. Just like Rice Krispies Treats, spread everything out evenly in the dish with a wooden spoon. Then use another piece of parchment paper to press down on the bars like you're attempting to make diamonds out of them. The tighter you press them together, the better they'll hold up!
8. Wait 2-3 hours until the bars have cooled down completely. Remove the top layer of parchment paper, and lift the granola out onto a cutting board.
9. Cut it up into bars and wrap them up for chowing on whenever you need a snack!
10. Finished!
This recipe can be modded easily for whatever your tastes are. I've made them with peanut butter and chocolate chips and I've made them with toasted soy nuts and dried figs. Whatever you fancy can be done!
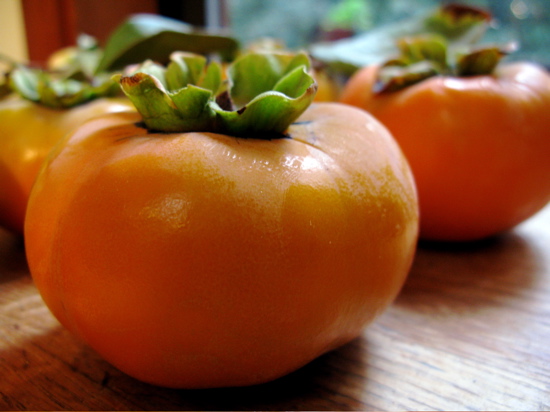
If you're in Japan, by now you've seen a bajillion persimmon trees around town and if
you're lucky you'll start seeing the fruit appear on your desk too.
Persimmons have a thick skin and sweet, almost creamy inside that lend
themselves well to dessert dishes. They're also a nice accompaniment
to braised pork, salads, and other savory dishes you would put apples
or cherries in. Traditionally in the US persimmons would be used to
make a baked pudding, similar to fruitcake. Japanese persimmons are
high in vitamin C and fiber so they make a good breakfast choice.
How to Prepare
You can just bite into one like an apple or slice it up and enjoy the
slices if you want a fast snack. Otherwise you treat it the same as an
apple in cooking. Most persimmons you buy in the store will be
seedless or have tiny seeds, so you generally don't need to worry about
deseeding them. Just cut off the top and start cooking!
Easy Persimmon Recipe
This is a recipe that a middle school girl I used to tutor many years
ago taught me. I'm amazed I was able to find it again! To make your
pudding extra fancy, cut off the tops of the persimmons and hollow out
the insides so that they become little cups. Fill the cups up with the
warm pudding and place in the fridge to set. Impressive presentation
that takes little effort!
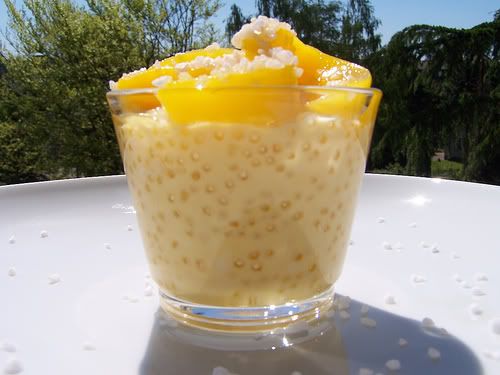
Persimmon Tapioca Pudding
Serves 4-6
Prep Time: About 1 hour
Ingredients:
1 cup small tapioca pearls
4 cups milk or coconut milk
2 large, ripe persimmons, the insides scooped out and chopped (or peeled and chopped if you're not making the cups)
4 tablespoons honey
1/2 teaspoon cinnamon
1/4 teaspoon ginger paste
1/2 teaspoon cardamom
pinch turmeric (for color) OPTIONAL
Preparation:
1. In a large pan, soak the tapioca pearls in the milk for about 40 minutes.
2.
In a small saucepan, add the cut persimmon, cinnamon powder, ginger and
2 tablespoons honey, and place the pan over heat. Stir well, cover and
cook on low till the fruit softens. Remove from heat and put aside.
3.
Place the pan with the tapioca soaked in milk over heat along with 2
tablespoons honey and the cardamom. Bring everything to a boil, reduce
the heat and simmer for about 5-7 minutes, stirring all the time.
4.
Add 3/4 of the cooked persimmons along with the turmeric and continue
to cook till the tapioca pearls are completely done and the mixture has
thickened. Keep stirring frequently.
5. Spoon into bowls or persimmon cups. Top with the reserved cooked persimmons. Serve warm or chilled.
6. Finished!
Asian pears: crispy, juicy, delicious. And because they are much
firmer than their European counterparts, can be used as a substitute
for apples in most recipes. Asian pears are high in fiber as well as vitamins K and C.
How to Prepare
You can prepare an Asian pear the same way you would apples. Just decore and start cooking!
Easy Asian Pear Recipe
The first year I was in Japan there were some Asian pears hanging out
in the clearance bin of my local supermarket. Regardless of the fact
that I had eaten Asian pears plenty of times in the States, for some
reason I was under the delusion they were apples. So I bought them
with the intention of making some applesauce with them. Even when I
got home and was decoring and chopping up these "apples" I was
thinking, "Gee, these are some juicy apples!" It wasn't until I had
finished making the "applesauce" that I realized they were Asian
pears. A really dumb moment in my kitchen but it turned out to be
delicious!
Pearsauce
Serves 4
Prep Time: About 30 mins
Ingredients:
6-8 large Asian pears, peeled, cored, cut into small pieces
1/2 cup water
1/4 cup brown sugar
2 tablespoons fresh lemon juice
1 1/4 teaspoons ground cardamom or cinnamon
1/2 teaspoon fresh grated ginger
Preparation:
1. Combine all ingredients in heavy medium saucepan. Cover, bring to boil.
2. Reduce heat to medium-low; simmer until apples are very tender, stirring occasionally, about 30 minutes.
3. Cool slightly.
4. Smush pears with a potato masher or a pork for chunky sauce. For smooth sauce, transfer to a blender and blend until smooth.
5. Finished!
One thing my great-grandmother would always do when she made homemade applesauce was to serve it warm with a dollop of sour cream on top. It's just as delicious when done with this pearsauce.
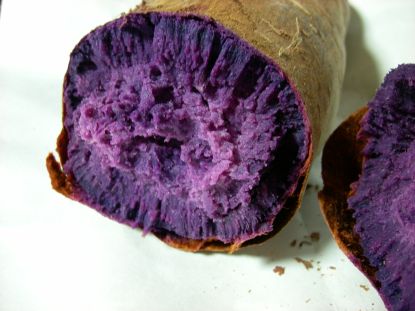
In Japan, schools often take their class trip to Okinawa, a subtropical island a stone's throw from Taiwan. One of the better known vegetables from Okinawa is purple sweet potatoes, known as beni-imo or murasaki-imo
in Japanese. I found them at the market today so they're officially in
season! Purple sweet potatoes are awesome because they're bright
purple. How many natural foods can claim that? They have a milder
taste than orange sweet potatoes but can be used in all the same ways.
I've even made purple sweet potato pie from these potatoes which made
the pie look like it was radioactively glowing. Kick ass!
Outside of Japan, I have heard more and more markets are carrying purple sweet potatoes. So take a look around or ask your local farmers at the farmers' market. Maybe if you pique their interest enough they'll look into growing them!
How to Prepare
Same way you would any potato:
Easy Beni-imo Recipe
When your star ingredient is such a cool color, you want a way to showcase it!
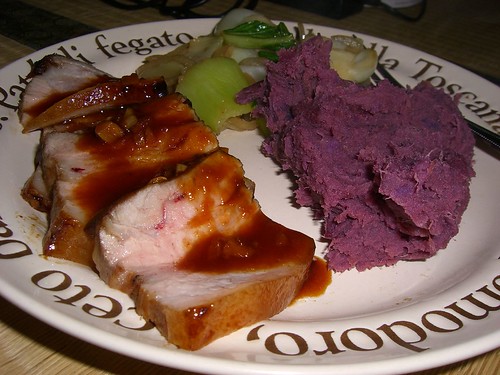
Jazzed Up Mashed Sweet Potatoes
Serves 2-3
Prep Time: About 30 mins
Ingredients:
2 large purple sweet potatoes, either roasted in the oven or cooked in the microwave
2 tablespoons butter or olive oil
1/4 cup milk
1/2 teaspoon salt
1/4 teaspoon togarashi
1/4 teaspoon cinnamon
1/2 teaspoon finely grated lime zest
1.5 tablespoons lime juice
1/4 cup chopped fresh cilantro OPTIONAL
Preparation:
1. Cut open sweet potatoes and scoop out their innards into a bowl.
2. Add rest of the ingredients. Mash together until well blended.
3. Serve!
I really like these potatoes with some pork chops or chicken that has been marinated in some sort of cumin marinade.
Natto is the product of leaving your soybeans out for too long so they start to ferment and become questionable. Natto is a rich source of protein and contains pyrazine and nattokinese, thought to prevent blood clotting and thrombosis. Natto conspiracists even tried to claim natto would make you lose weight, causing the Great Natto Shortage of 2007, but it was soon found out the entire thing was made up. As many people in the Kansai area will tell you, its sticky texture and overpowering smell makes it better suited for a trashcan than your mouth but I suppose it's something everyone should try at least once.
How to Prepare
Open the package, hold your nose, and stir it up!
Easy Natto Recipe
Here is a recipe that takes care of the two issues most people have with natto, the texture and the smell.
Natto Fried Rice
Serves 2-3
Prep Time: About 30 mins
Ingredients:
2 cups of cooked rice or brown rice
1 pack (50g) of natto
Approx. 1 cup chopped scallions
Approx. 1 cup chopped vegetables, whatever you have on hand - peppers, carrots, greens, broccoli, etc.
1/4 cup shredded pink pickled ginger 紅生姜
1 tablespoon sesame oil ゴマ油
1 teaspoon togarashi
2 Tablespoons soy sauce
Salt and pepper to taste
Preparation:
1. Chop up all the vegetables.
2. Heat up a wok or large non-stick frying pan with 1/2 of the sesame oil. Add the green onions and the vegetables, and sauté until the vegetables are a little limp.
3. Add the natto and 1 Tbs. of soy sauce. Sauté until the stickiness of the natto has dissipated.
4. Add the rest of the oil, the ginger and the rice. Stir-fry until the rice and the other ingredients are evenly mixed. Push the mixture to one side, and add the rest of the soy sauce to the bare surface of the pan. Stir-fry a couple of minutes more until everything looks and smells toasty.
5. Season with pepper (probably needed) and salt (probably not needed - taste some before adding!)
6. Finished!
When I first heard of yuzu, it was in the form of some not-so-pleasant cough drops. The second time I heard of yuzu, it was in an even worse yogurt concoction. As a result, I stayed away from yuzu for a long time and that's a shame! As it turns out yuzu is a delicious citrus that can easily take the place of lemon in most dishes. Kind of a cross between a lemon and a grapefruit but sweeter, yuzu is what gives ponzu sauce its zip. You can also find candied yuzu peels in the yuzu sodas popular in Japanese cafes and one of my favorite drinks to indulge in. Right now you can buy big bags of yuzu for cheap at the farmer's market in Japan, making it a delicious treat.
How to Prepare
Look for fruit that has a firm rind but slightly gives when pressed on. It should also be very fragrant and be free of large, black blemishes. Just like any citrus, you just cut it open and squeeze out the juice. You'll find that yuzu tends to have more pith and less juice than lemon. The zest is also great for flavoring dishes.
Easy Yuzu Recipe
I remember as a little kid receiving a copy of Felicity's Cookbook (remember the American Girl dolls that were all the rage?) and the first thing I made from it was the syllabub. Syllabubs were all the rage in England and its colonies before the advent of ice cream. Now what makes a syllabub different from a mousse I have no idea but syllabub is a fun word to say so I'm sticking with it.
Yuzu Syllabub
Serves 4
Time: About 10 minutes
Ingredients:
grated rind and juice of 2 yuzu
4 tablespoons sweet white wine 甘口ホワイトワイン
6 tablespoons superfine sugar 上白糖
300 ml heavy cream 生クリーム
Preparation:
1. Warm the sugar, juices and zest gently until the sugar is completely dissolved. Allow to cool slightly.
2. Add the wine to the yuzu mix and let sit for one hour.
3. Whip the cream to soft peaks.
Tip: To make your life easier, place a metal bowl in the freezer until time to whip the cream. The cold bowl makes whipping much faster. 4. Fold in the wine mixture. 4. Pour into glasses and chill well. 5. Serve decorated with freshly grated yuzu rind.
6. Finished!
One of the easiest desserts you'll ever make and so delicious!
I've been living in Japan for four years now teaching high school English. During my time I've come to learn a lot about fresh ingredients I had never even heard of back home. Come learn with me and discover new ingredients to spice up your kitchen!







 Natto is the product of leaving your soybeans out for too long so they start to ferment and become questionable. Natto is a rich source of protein and contains pyrazine and nattokinese, thought to prevent blood clotting and thrombosis. Natto conspiracists even tried to claim natto would make you lose weight, causing the Great Natto Shortage of 2007, but it was soon found out the entire thing was made up. As many people in the Kansai area will tell you, its sticky texture and overpowering smell makes it better suited for a trashcan than your mouth but I suppose it's something everyone should try at least once.
 Serves 2-3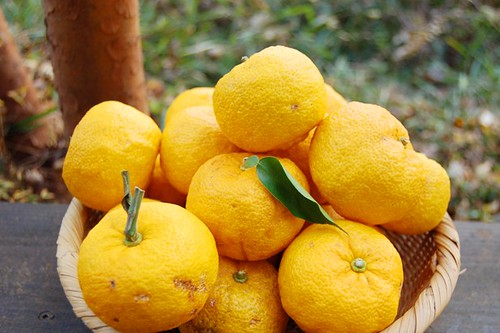


 Posts
Posts


